Frogatto & Friends

Frogatto sprite

Frogatto & Friends is an action-adventure platformer game, starring a certain quixotic frog.
We're an open-source community project, and welcome contributions!
We also have a very flexible editor and engine you can use to make your own creations.

Frogatto comes to the Humble Store

May 15th, 2013 by Sirp

Frogatto is now available for sale for PC and Mac on the Humble Store! Go and get it here!

If you’re curious about what Frogatto is all about before purchasing, check out our trailer:

(Edit: Since a few people have been confused by this, it’s worth noting that the “Humble Indie Store” isn’t a storefront site like Amazon or Steam which you can go to and look at a whole selection of games in (despite the fact that the HIB is kinda close to being able to do this for their periodic bundles). It may become that at some point, but for now, it’s just a widget on individual game-developer’s sites which you can use to buy the game. So if you go looking for a “Humble Indie Store” to buy the game in, you won’t find one yet; instead, you’d need to go to our downloads page to get it from there.)

FacebooktwitterredditmailFacebooktwitterredditmail

Shaders in Frogatto

October 28th, 2012 by Sirp

I’ve been playing around with some OpenGL shader features in Frogatto. Here are some videos showing what I’ve come up with:

FacebooktwitterredditmailFacebooktwitterredditmail

A Gentle Introduction to Frogatto Formula Language

May 25th, 2012 by Sirp

Frogatto Formula Language (FFL) is the language used to customize Frogatto and control its behavior. I’ve talked about how Frogatto’s event handling system works before, right here.

Today I’m going to talk more about how FFL works, giving an overview of the language.

Getting Started

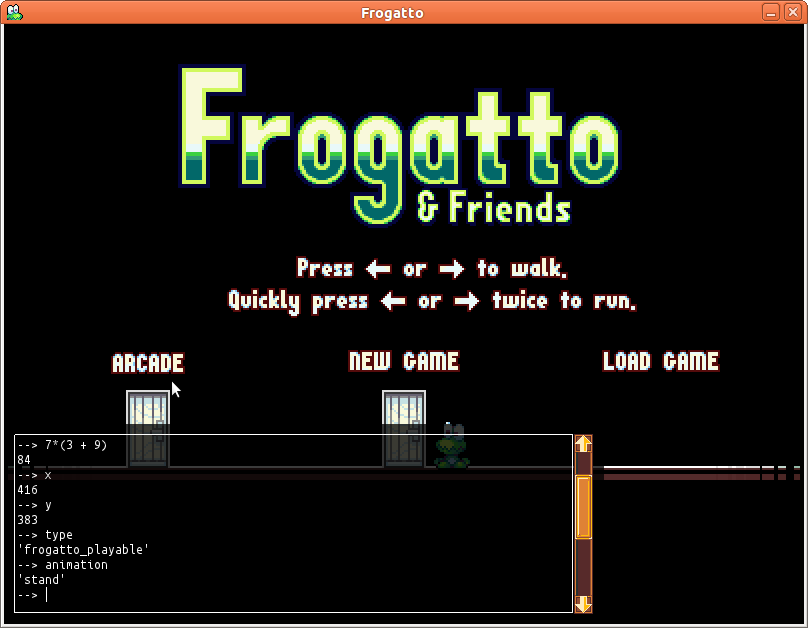
Becoming familiar with FFL is easy. Just start Frogatto and press ctrl+d to enter the debug console. The debug console allows you to type FFL statements and have them evaluated right then and there. Try some basic commands:


--> 4 + 5
9
--> 7*3 + 9
30
--> 7*(3 + 9)
84
-->

Accessing an Object

When an FFL formula is executed, it has an object it is operating on. When you first open the debug console, that object is the player. Let’s try some basic formulas that find information about the player:


--> x
416
--> y
383
--> type
'frogatto_playable'
--> animation
'stand'
-->

Frogatto debug console

You can output the entire player object by entering self as a command — it will show you all the fields the player has to offer!

Where Clauses

For convenience, FFL supports where clauses that appear at the end of an expression to define additional values:


--> 2*n + n*n where n = 5
35

Object Mutation

So far we’ve seen how to query the values from an object. If you enter a formula that returns a command, the debug console will execute the command on the object. It might be a good idea to pause the game, by pressing ctrl+p before executing commands, so you can clearly see what’s going on.

Let’s try executing some commands:


--> set(y, y-250)
(0xaebeb30) {}\
--> set(facing, 1)
(0xaebec80) {}
--> set(upside_down, true)
(0xafbed90) {}
-->

Frogatto upside down!

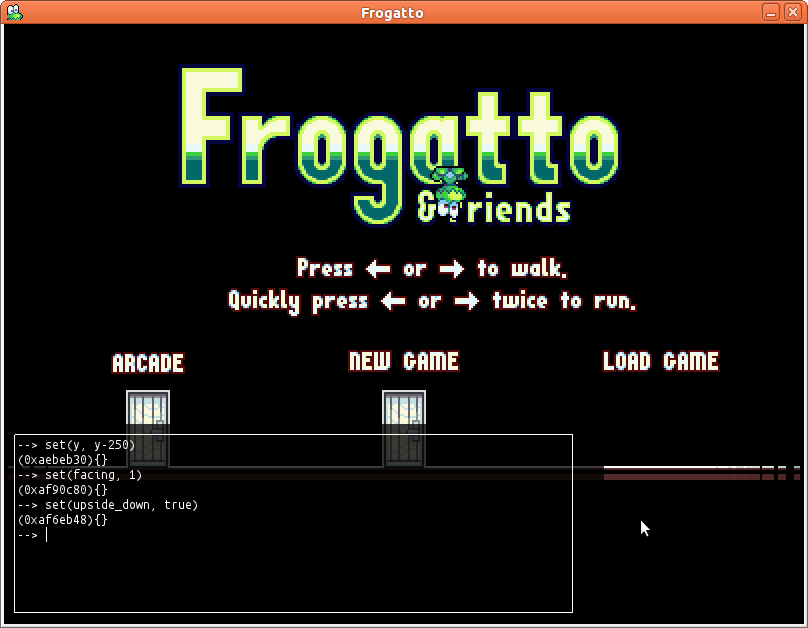
Remember, what you are executing here in the debug console is the same kind of thing you would execute in an event handler when it is executed.

When the debug console is open, you can click on objects to select them, and they will become the focused object — they will be the context of any formulas you enter. For instance, you could click on a door, and then start typing commands to modify it.

Basic data types

As we’ve seen, Frogatto can handle manipulation of integers. You may have noticed it also supports strings. e.g.


--> type
'frogatto_playable'

Strings can be concatenated, just as integers can be added:


--> 'abc' + 'def'
'abcdef'

You can also multiply a string by an integer:


--> 'abc' * 4
'abcabcabcabc'

Other types, such as integers, can be concatenated to a string using +:


--> 'you have ' + 5 + ' coins'
'you have 5 coins'

FFL also supports decimal numbers:


--> 4.25 * 0.3
1.275
--> 10.8 + 5
15.8
--> -0.5 - 0.8
-1.3

FFL decimals are not floating point numbers. They use fixed point arithmetic and store up to six decimal places. Their behavior is consistent across machines.

FFL also supports the boolean types, true and false as well as the value null to represent no object.

Basic Operators

FFL supports the following basic operators:

  • + – * /: arithmetic operations
  • and or not: boolean operators
  • %: modulo operator. e.g. 9%8 -> 1
  • ^: exponentiation operator. e.g. 2^8 -> 256
  • = != <>=: comparison operators

Note that unlike many languages, = is used to test for equality, as FFL doesn’t have built-in assignment. Assignment is done by returning a set() object from a formula, requesting the game engine to perform the equivalent of an assignment.

Random Numbers

FFL supports random numbers using the d operator:


--> 3d6
5
--> 3d6
11
--> 3d6
12
--> 50d100
2613
--> 3d faces where faces = 10
12
--> ndice d faces where ndice = 3, faces = 6
16

Functions

FFL has a wide range of built-in functions. A function is executed using function_name(parameters). A fundamental function is the if function:


--> if(2 < 4, 1, 2)
1
--> if(2 > 4, 1, 2)
2

if tests the first parameter and if it’s true, it will return the second parameter, otherwise it will return the third parameter. The third argument is optional, and will be null if not provided.


--> if(1 > 2, 5)
null

There are also functions to convert values from one type to another, or test the type of a value:


--> str(4)
'4'
--> is_int(4.2)
false
--> is_int(4)
true
--> is_string('abc')
true
--> is_string(4)
false
--> floor(4.2)
4
--> ceil(4.2)
5
--> round(4.2)
4

Lists

FFL supports lists which are enclosed in square brackets:


--> [5, 2+4]
[5, 6]

Lists can be appended using the + operator:


--> [3, 5] + [7]
[3, 5, 7]
--> ['hello', 'there'] + [5, true, [4, 5]]
['hello', 'there', 5, true, [4, 5]]

Note how lists can be nested. i.e. you can have lists of lists. Lists can be multiplied just like strings:


--> [1, 2, 3] * 3
[1, 2, 3, 1, 2, 3, 1, 2, 3]

A single element of a list can be accessed using square brackets:


--> a[2] where a = [1,2,3,4]
3

You can also take a slice of a list using [begin:end] after the list:


--> a[2:5] where a = [1,2,3,4,5,6,7]
[3,4,5]
--> a[1:] where a = [1,2,3,4,5,6,7]
[2,3,4,5,6,7]

You can find the number of elements in a list using the size() function:


--> size(a) where a = [1,2,3]
3

Lists can be compared using = and != operators, and also using the relational operators,=. For instance,


--> [2,3,4] < [5,6]
true
--> [2,3,5] false

You can find if an item is in a list using the in operator:


--> 3 in [2,3,4]
true

Functions for Operating on Lists

FFL supplies a range of functions for operating on lists. One such function is the map function:


map(list, expression): evaluates expression once for each item in list, giving 'value' as the name of the item.

This is perhaps best explained with an example:


--> map([1,2,3,4], value*value)
[1, 4, 9, 16]

Note how the expression value*value is evaluated once for each item in the list, with value containing that item. One thing that might seem strange to experienced programmers is how the parameter passed to the function is not eagerly evaluated, but rather, the function chooses when to evaluate it, and even what context to evaluate it in.

The map function can take an additional argument specifying the name of the parameter, to something other than value. For instance,


--> map([1,2,3,4], n, n*n)
[1, 4, 9, 16]

The range function is useful for generating a list of integers:


--> range(10)
[0, 1, 2, 3, 4,5, 6, 7, 8, 9]
--> range(5, 10)
[5, 6, 7, 8, 9]

The range function is often useful to produce a list to pass to map.

The filter function is useful for taking certain elements of a map that pass a certain criteria:


filter(list, expression): evaluates expression once for each item in list, and returns a list of all the items for which the expression was true.

For instance,


--> filter(range(10), value%2 = 1)
[1, 3, 5, 7, 9]

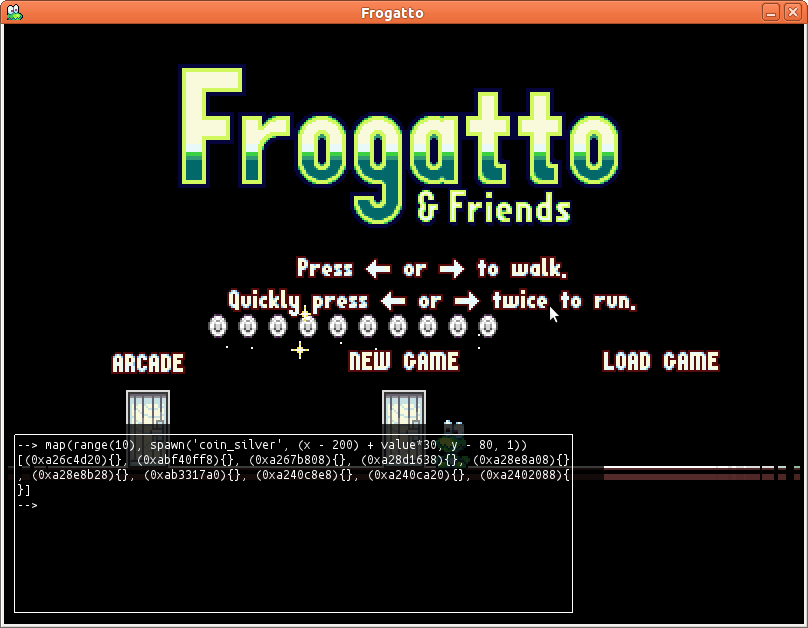
Map + Filter + Range: Example

The spawn function can be used to create an object. For instance, spawn('coin_silver', x, y-80, 1) will create a silver coin 80 pixels above Frogatto’s head. Let’s suppose we wanted to create ten coins in a row, we could do this:


--> map(range(10), spawn('coin_silver', (x - 200) + value*30, y - 80, 1))

This will create a list of 10 spawn commands, creating 10 coins spaced out above Frogatto’s head.

Now suppose we wanted to move all these coins up by 20 pixels. level.chars holds a list of all the objects in the level. We could filter by type to find all the coins in the level, and then use map to map these objects to set commands:


--> map(filter(level.chars, value.type = 'coin_silver'), set(value.y, value.y - 10))

This will move all silver coins in the level up 10 pixels.

List Comprehensions

Frogatto supports a convenient way to build lists, known as list comprehensions. Let’s start with an example:


[n^2 | n <- range(10)] = [0, 1, 4, 9, 16, 25, 36, 49, 64, 81]

This is equivalent to saying "for each n in range(10), generate a list with n^2". A list comprehension can also contain filtering conditions on the input list. For instance, if we wanted to square only even numbers, we could do this:


[n^2 | n <- range(10), not n%2] = [0, 4, 16, 36, 64]

A list comprehension can take multiple input lists, in which all the combinations of elements in each list are used. For instance:


[a + ' ' + b | a <- ['small', 'big', 'huge'], b <- ['ant', 'bird', 'bat']] = ['small ant', 'big ant', 'huge ant', 'small bird', 'big bird', 'huge bird', 'small bat', 'big bat', huge bat']

List comprehensions are a convenient alternative to using map and filter. This formula from earlier can be re-written using list comprehensions:


map(range(10), spawn('coin_silver', (x - 200) + value*30, y - 80, 1))

As a list comprehension:


[spawn('coin_silver', (x - 200) + n*30, y - 80, 1) | n <- range(10)]

Dictionaries

FFL supports dictionaries, also known as maps. A dictionary is a series of key:value pairs written within curly brackets. For instance,


--> {y: 5, x: 2}
{'x': 2, 'y': 5}

Note how the keys are assumed to be strings, rather than x and y being interpreted as expressions. Also, keys in a map are always sorted.

Any FFL type may be a key in a map. Integers, booleans, lists, and even other maps are valid keys:


--> {[3,4,5]: 7, {a: 5}: 9}
{[3, 4, 5]: 7, {'a': 5}: 9}

Elements in maps can be looked up either using the . operator, or using []:


--> a.name where a = {name: 'Frogatto'}
'Frogatto'
--> a['name'] where a = {name: 'Frogatto'}
'Frogatto'

The . operator only works on string keys that are valid identifiers (a valid FFL identifier begins with a letter or underscore and consists of letters, underscores, and digits). The [] operator can be used for all types of keys.

Objects

FFL supports objects as data types. An object looks and behaves similar to a dictionary, however an object may have additional behavior or properties to a regular dictionary. FFL doesn't have support for directly creating objects, but an FFL formula might be given access to an object, or have an object returned by a function.

One example of an object is the game object that represents Frogatto. When you start the debugger, you have access to the player's game object. That is why you can enter a formula such as x or y or type and see a result. The level itself is exposed as an object, and all objects have access to it through their level property.

Another example of objects are command objects. Command objects are created and returned when you call a function like set() or spawn(). These types of objects don't actually have any interesting values that can be queried from FFL. That is why you see a result like this:


--> spawn('coin_silver', 10, 10, 1)
(0xb825640){}

This formula returns a spawn command object, but the contents of the object are opaque to FFL, so all FFL knows about it are the address and then has an empty {} properties map. FFL doesn't need to know how to query or manipulate a command object though, since the entire idea is to return it to the game engine, and the game engine knows how to execute the command and make the object get spawned.

This is a general tutorial on FFL, so I'm not going to get too into the different types of objects available. The crucial thing to understand, though, is that FFL is a pluggable language that can be used in different contexts. The most common use for FFL right now is to write Frogatto event handlers with, however it's designed to be used in different contexts -- we also use it to write editor scripts with, gui scripts, and scripts to manipulate FSON documents. Depending on how and where you use FFL you will have access to different types of objects.

Functions

You can define your own functions in FFL:


--> def f(n) n^2 + 5; f(5) + 2
32

Functions are themselves variables that can be passed to functions and otherwise treated as regular values. For instance,


--> def f(fn, x) fn(5, x); def add(a, b) a + b; f(add, 2)
7

Note: Built-in functions currently cannot be treated as values or passed around. We are looking to fix that in a future release.

Functions can have default arguments specified:


--> def f(a, b=5) a+b; [f(1,1), f(2)]
[2, 7]

Recursion

Functions can call themselves. As an example, suppose you wanted to write a function index(list, item) -> returns the index of the first occurrence of item in list, or -1 if item is not in list

you could do it like this:


def index(list, item, n=0) if(list = [], -1, if(list[0] = item, n, index(list[1:], item, n+1)))

As another example, FFL has a builtin sort() function, but if you wanted to make your own sort, you could implement quicksort like this:


def qsort(list) if(size(list) qsort(filter(list, value < pivot)) +
filter(list, value = pivot) +
qsort(filter(list, value > pivot))
where pivot = list[0])

True or False?

At certain times, FFL will test whether a value is considered 'true' or 'false'. The following values are considered false:

  • false
  • null
  • 0
  • 0.0
  • []
  • {}

All other values are considered true. Note that the and and or operators have particularly interesting behavior: or will evaluate to its first argument if its first argument is a true value, otherwise it will evaluate to its second argument. Likewise, and will evaluate to its first argument if its first argument is a false value, otherwise it will evaluate to it second argument.


--> 5 or 2
5
--> false or 8
8

Wrap-Up

I hope this FFL overview has been helpful. Please post any feedback or comments below!

FacebooktwitterredditmailFacebooktwitterredditmail

Developing Games using the Frogatto Engine: Part 3

May 15th, 2012 by Sirp

For part 3 of the tutorial on developing a game with the Frogatto engine, I’ve decided to do a series of videos demonstrating how to add walking, jumping, and crouching to Elisa. I recommend watching the videos in as high resolution as you can. Here are the videos:


+ Recommended Reading
→ Next Page
Table of Contents
Previous Page

FacebooktwitterredditmailFacebooktwitterredditmail

How Event Handling in Frogatto Works

May 5th, 2012 by Sirp

I’m going to take a little detour from my series on how to make a game in Frogatto to discuss in detail an important topic to anybody who wants to develop using Frogatto: how event handling works.

Frogatto’s game objects receive ‘events’ frequently. They receive a create event in the first frame they run, a collide_side event when the object runs into a wall, a collide_feet event when landing on the ground, and a jumped_on event when another object lands on top of the object. They even receive a process event that is triggered every frame. There are around 30 built-in events, and more types of events can be added.

Events are the big chance you, as a game developer, have to customize an object’s behavior. When an event occurs on an object, you get to specify any actions the object should make in response.

Frogatto’s event handlers are written in Frogatto Formula Language (FFL). FFL is very different from many other computing languages, such as Python or Lua or Javascript in that FFL is a pure functional language. What this means is that FFL’s entire purpose is to run some calculations and return the results of these calculations. An FFL formula has no ability to directly change the game state.

Huh? How does this work then? What use is writing some code if it can’t actually change anything? Here is how it works: when an event occurs, the game engine evaluates the FFL formula — during this evaluation the game state is completely frozen — and the formula returns one or more command objects. After the FFL has finished running and returned its results, the game engine steps through these commands that FFL returned and executes them.

This might seem like a distinction without a difference, but it’s very important. Note the difference between when the game engine evaluates FFL (without allowing modification of the game) and then, once the FFL is done, executes the commands that FFL gave it. This has the huge benefit of making it so an FFL formula runs in an environment where nothing changes, where everything can be viewed as a mathematical model of the current game state — where one doesn’t have to keep track of the possibility of variables changing during the evaluation of a formula.

Anyhow, enough theoretical talk! Let’s get down to a concrete example. We’ll start with a simple one. Suppose we have an object which steadily moves upwards by 2 pixels every frame, here is how we could make it work:


on_process: "set(y, y-2)"

Every frame, the process event gets fired. The FFL code, set(y, y-2) is evaluated. What is this ‘set’ thing? It’s a built-in function that returns a set command. If the object’s y position was 100 before the event was triggered, the FFL will evaluate to a set command with the information encoded to set the value of ‘y’ to 98.

After the FFL returns this command and has finished, the game engine will execute the command. Executing the command will result in setting the object’s y value to 98, shifting it up 2 pixels. Note that the process of evaluating the formula is part of FFL. Executing the command takes place within the game engine, and there is no FFL involved.

The set function is the most often used function out of an extensive suite of functions FFL has available for generating commands. There are commands for playing sound and music, for spawning new objects, for different graphical effects, for debugging, and so forth.

Note that it is important to understand the difference between an FFL function that returns a value that is useful in FFL, and an FFL function that returns a command. For instance, FFL includes the sin function, which returns a value that is useful in intermediate calculations but doesn’t make much sense to return to the game engine. The spawn function gives us a command which, when executed by the game engine, spawns a new object and is exactly the kind of thing we might return to the game engine.

FFL is a full-fledged programming language, and we can include complex logic in it. Let’s say we wanted to make the object reverse direction every two seconds (i.e. every 100 frames). We could write the event like this:


on_process: "if((cycle/100)%2 == 0, set(y, y-2), set(y, y+2))"

Note how, in FFL, if is just a function. It looks at its first argument, and if its first argument is true, it’ll evaluate to its second argument (the ‘then’ clause) otherwise it’ll evaluate to its third argument (the ‘else’ clause).

I want to dive much deeper into how FFL works, and what can be done with it, but that will wait until a later post. Right now, I want to talk more about the event handling mechanism Frogatto uses.

Like I said, an event handler is evaluated and then after the FFL has returned its results, those results are executed by the game engine. This has some interesting implications. Firstly, FFL can return multiple commands in a list, like this:


on_process: "[set(y, y-2), if(y < 0, set(x, x+2))]"

This will return commands to decrement y by 2, and if y is less than 0, increment x by 2. Note though that since the entire formula is evaluated before any execution occurs, the value for y throughout the formula is the value at the start of the event. This means that if y is 1 before the event occurs, the if condition will fail, because the set(y, y-2) will not be executed until after the event returns.

Consider this code:


on_process: "[set(y, 5), debug(y)]"

debug evaluates to a command that outputs its arguments, in the game window and the console. Very useful for debugging. Note though that it will output the value of y as it was before the event was fired. If you wanted it to output 5, you might do something like this:


on_process: "[set(y, new_value), debug(new_value)] where new_value = 5"

Now consider this code,


on_process: "[set(y, y-100), set(y, y-5), set(y, y-2)]"

Pretty silly code, right? But what does it do? Say y was 100 before the event was called. We will return three set commands, the first will be encoded to set y to 0, the second to set y to 95, and the third to set y to 98. The game engine executes commands in a list in order, so the last command will set y to 98, and the first two commands will in effect do nothing.

One special function is the fire_event function. It returns a command that explicitly fires an event. For instance,


on_process: "[set(x, x-2), set(y, y-2), fire_event(self, 'output_state')]",
on_output_state: "debug(x, y)"

When the process event occurs, commands will be returned to decrement x and y, and then a command to fire an 'output_state' event. These commands will be executed in sequence. x and y will be set, and then output_state will be fired, causing on_output_state to be evaluated. Finally, the debug command returned by on_output_state will be executed, causing the updated x, y to be output.

Note that fire_event is very useful in some situations, but should be used judiciously. Its main purpose is NOT to allow chaining of events like this, but to allow us to fire_events on other objects (e.g. if we hit another object we might want to fire an event on them to know they've been hit).

Hopefully this gives us a nice overview of how the Frogatto event system works. Hopefully, soon, I'll write more about all the features FFL has to offer. In the meantime, you might like to check out our FFL FAQ.

FacebooktwitterredditmailFacebooktwitterredditmail

Developing Games using the Frogatto Engine: Part 2

April 28th, 2012 by Sirp

Gravity and Collision Detection

Last time, we made our hero, Elisa, and gave her a basic slashing animation. Since we’re making a platformer, we’d really like Elisa to be subjected to gravity, and to be able to land on and walk on the ground.

The simplest way to represent gravity is to give objects vertical acceleration. The simplest way to do this is on a per-animation basis. We can add this to each animation:


accel_y: 80

This gives the object acceleration of 80 milli-pixels per cycle^2. The acceleration is set when the object enters the animation. We could also use FFL to set an object’s acceleration in any event, such as by using set(accel_y, 80).

Using this code, I make a little level, containing Elisa, with some ground tiles beneath her. She falls, but she doesn’t have any collision detection logic yet, so she falls straight through the tiles!

Elisa is an object that should be solid. We want her to land on ground tiles, and not be able to walk through them. There is an additional problem with Elisa’s animations from last session: her animations are of different sizes. The game engine keeps the upper-left corner of the object in the same position, but this causes her to jerk forward when slashing.

Both these problems are solved by giving her a solid area. This is specified by specifying a rectangle in [x1,y1,x2,y2] format in each animation:


solid_area: [16,10,32,50],

This specifies the area within the frame which is solid. Naturally this is calculated by loading the image into an image editor and looking at the appropriate co-ordinates for the solid rectangle for an animation.

Once I do this, I start the game, and Elisa falls onto the platform and stands on it! That was nice and easy.

What is important is that we make a solid_area for the attack animation which is the same size as the standing animation, but with the position adjusted appropriately. Frogatto has a notion of an object’s “feet”, which is a pixel position within each animation that is the anchor-point for the animation. The feet of an object are found in the bottom middle of its solid rectangle. This is the point with which it collides with the ground, and the point at which animations are anchored. When an object changes its animation, the feet remain the same place, as does the solid area (assuming the solid areas are the same size for each animation).

We can run the game with the –show-hitboxes option to see the collision area for Elisa:

Perfect — Elisa will now fall, until she lands on a surface, which she’ll stand on. Here is the full code listing:


{
id: "elisa",
is_human: true,
editor_info: { category: "elisa" },
on_end_stand_anim: "set(animation, 'stand')",
on_end_attack_anim: "set(animation, 'stand')",
on_ctrl_tongue: "[set(animation, 'attack')]",

on_process: “if(ctrl_left, set(x, x-2))”,
animation: [
{
id: “stand”,
image: “characters/elisa-spritesheet1.png”,
rect: [4,4,57,57],
solid_area: [16,10,32,50],
pad: 3,
duration: 5,
frames: 3,
reverse: true,
accel_y: 80
},
{
id: “attack”,
image: “characters/elisa-spritesheet1.png”,
rect: [5,180,93,240],
solid_area: [26,16,42,56],
pad: 3,
duration: 5,
frames: 6,
frames_per_row: 3,
accel_y: 80
},
]
}

That is all for today’s lesson. Next time I intend to show you how you can make Elisa walk and jump, and in doing so we’ll step more into Frogatto’s event handling mechanisms, and learn more of Frogatto Formula Language.


Next Page
Table of Contents
Previous Page

FacebooktwitterredditmailFacebooktwitterredditmail

Developing Games using the Frogatto Engine: Part 1

April 24th, 2012 by Sirp

So you want to make a game, and you think the Frogatto engine might be for you? This is the first in hopefully a series of posts which document just how to do that. These posts are targeted at people with some technical knowledge — who know how to run Frogatto from the command line and pass command line arguments to it, know how to edit text files, and have some coding knowledge or who are eager to learn. I will also assume that you have some level of familiarity with the Frogatto Editor (accessible by pressing ctrl+e while in a game of Frogatto).

I’m going to develop a simple platform game, featuring a sword-wielding heroine, Elisa, which I’m calling Elisa’s Quest.

To begin with, Frogatto features a module system. You can put your game in its own module, and then when you run Frogatto, you can specify which module you want to use. This allows you to develop your own game without interfering with the core Frogatto game.

To create a module for Elisa’s Quest, we make a new directory under the Frogatto install, in modules/elisa. Then we create a basic configuration file for our module, in modules/elisa/module.cfg using our favorite text editor. We enter this into the file:

{
id: "elisa"
}

This file is the main module configuration file. For now the only setting is to specify the ID of the module, but we are likely to add more settings here later.

Game Objects

In our game, we will want our sword-wielding heroine to jump from platform to platform, battling vampire bats, collecting coins, and avoiding traps of spikes. Each of these things — the heroine herself, platforms, bats, coins, and spikes, are examples of game objects (often just called ‘objects’) that we must define to the game engine.

An object’s appearance and behavior is specified in a single .cfg file that will be placed under modules/elisa/data/objects. It can be placed directly in this directory or in any sub-directory, so if you’re making a substantial game, it’s a good idea to categorize the different objects into different directories.

An object needs a sprite sheet, a png file which contains its art. Multiple objects can share a single sprite sheet, or one complex object might have its images split across multiple sprite sheets. All images will go under modules/elisa/images — which is the directory Frogatto searches for images in.

We’re going to start by defining our heroine, Elisa. Here is the sprite sheet for her, which I will put in modules/elisa/images/characters/elisa-spritesheet1.png :

Elisa, in all her glory

Note that both the background color and the color of the red rectangles around the sprites are special colors (#6f6d51 and #f9303d) which the engine treats as fully transparent. This allows you to organize your sprite sheets, and indicate frame boundaries, though isn’t strictly necessary. The Frogatto engine also fully supports alpha channels, which you can alternatively use for transparency.

Note also the size of the image. All that extra space around it isn’t just arbitrary. Widths and heights of images provided to the Frogatto engine should be powers-of-2 (i.e. 2, 4, 8, 16, 32, 64, 128, 256, 512, or 1024). Here, we’ve padded the image out to make it a 512×512 image. If Elisa was a little shorter, we could have made it a 512×256 image.

Now it’s time to start defining Elisa’s behavior. We create a file in modules/elisa/data/objects/characters/elisa.cfg:


{
id: "elisa",
is_human: true,
editor_info: { category: "elisa" },
animation: [
{
id: "stand",
image: "characters/elisa-spritesheet1.png",
rect: [4,4,57,57]
}
]
}

This is a fairly bare-bones definition of an object. Let’s see what it tells us:

  • The object’s ID is elisa. This must correspond to the filename (elisa.cfg)
  • elisa is ‘human’. That is, she is controlled by the player. In a single player game, there may only be one object in existence at a time that has this flag. Many games will only have one object that has is_human: true.
  • elisa goes into an editor category called ‘elisa’. This means when you want to add an elisa object to a level in the Frogatto editor, you will find her under a category called elisa.
  • All objects must have a list of one or more animations. An animation consists of one or more frames. Right now we just have a single frame animation for elisa. Note that the rect: [4,4,57,57] specifies the top-left most sprite in her sprite-sheet.

This definition of Elisa is written in Frogatto’s Object Notation (FSON) — basically JSON with a few additional features. FSON is used extensively throughout Frogatto as a data language to define the properties of objects.

Adding Elisa Using the Editor

Now we can try out the Elisa object in-game. One of the nice things about Frogatto’s module system is when you run a module you still have access to Frogatto core game data, when you’re first testing your game you can do so, mixing it with Frogatto’s assets, before all yours are fully developed.

We invoke the game with the --module command line argument: frogatto --module=elisa. This runs the game, loading our module. We press ctrl+e to open the editor, and then we can easily find and add the elisa object to a game of Frogatto:

Elisa in the editor

Now, at the moment, all the elisa object does is stand there, frozen still. We haven’t given her any other behavior yet. If we look at the Elisa spritesheet, we notice that the top three images are all part of a standing animation, meant to make Elisa move a little, even when standing.

Elisa's stand animation

Note how the frames are of uniform size and spacing. This is how the engine expects frames of the same animation to be laid out. An animation definition may contain a specification of how many frames there are in the animation, along with the duration, in game cycles, of each frame. A padding may be specified to show how many empty pixels there are between the frames on the sprite sheet. In this case we have three pixels between frames.

This animation also isn’t meant to be played to the end, and then started over. Instead, it’s meant to be played forward (Elisa inhaling) then played in reverse (Elisa exhaling). Some animations are designed to be played forwards and then backwards, and the engine provides a special reverse property to allow for that.

A little note at this point: we can continue to edit Elisa’s code using our text editor of choice. We can also use Frogatto’s built-in editor by pressing the “Code” button in the editor. If we use the in-game code editor, we will see Elisa update instantly as we make changes to the code. Even if we use an external editor, the game engine will update the changes we make without us having to exit and restart Frogatto! This feature is enabled as long as we are in the Frogatto editor.

Here is the code to turn the still standing frame into a proper animation:


{
id: "elisa",
is_human: true,
editor_info: { category: "elisa" },
animation: [
{
id: "stand",
image: "characters/elisa-spritesheet1.png",
rect: [4,4,57,57],
pad: 3,
duration: 5,
frames: 3,
reverse: true

}
]
}

After making this change, when we play the game, Elisa will play through her animation, but only once. Then she will freeze again, staying in the last frame of her animation. The game engine doesn’t know what to do with her next without some instruction. It might seem obvious: “she should start the animation over again!” — but it’s not so obvious. When elisa finishes an animation involving swinging a sword, we wouldn’t want her to just play that animation over again. Instead, we must provide instruction on what to do, and we provide that instruction through events.

Events

When we think about the behavior we want to specify for an object, much of it revolves around us wanting to specify how the object behaves when something happens. What should the object do when it lands on the ground? When it collides with a bat? When the player presses a button? When an amount of time elapses? When the level starts? These are all events. In this case, we are interested in what elisa should do when her ‘stand’ animation finishes.

We specify what should happen when an event occurs in an event handler. An event handler is a property in FSON which contains a formula that is evaluated when the event occurs. The formula is written in Frogatto Formula Language (FFL). This formula is able to query the current state of the game, and then return some commands. These commands that the formula returns will be executed by the game engine.

In this case, all we want to do is specify that when the animation finishes, it should be played over from the start. That, is quite simple:

{
id: "elisa",
is_human: true,
editor_info: { category: "elisa" },
on_end_stand_anim: "set(animation, 'stand')",
animation: [
{
id: "stand",
image: "characters/elisa-spritesheet1.png",
rect: [4,4,57,57],
pad: 3,
duration: 5,
frames: 3,
reverse: true
}
]
}

Whenever the ‘end_stand_anim’ event occurs on this object, the event handler is invoked, and it returns a command to set the object’s animation to ‘stand’ — which will start the stand animation over from scratch.

Now, let’s make it so Elisa can swing her sword. To do this, we’ll need to define her sword swing animation. We’ll also need to have an event to make her enter the animation. A ‘ctrl_tongue’ event will be sent when the ‘s’ button is pressed (due to this normally being the button which activates Frogatto’s tongue in Frogatto). We will use is to make Elisa swing her sword. However, Elisa can’t swing her sword any time. For instance, if she’s already swinging her sword, another press of ‘s’ should be ignored, so we’ll add some logic to make it so she can only swing her sword if she’s currently in her ‘stand’ animation:


{
id: "elisa",
is_human: true,
editor_info: { category: "elisa" },
on_end_stand_anim: "set(animation, 'stand')",
on_end_attack_anim: "set(animation, 'stand')",
on_ctrl_tongue: "if(animation = 'stand', set(animation, 'attack'))",
animation: [
{
id: "stand",
image: "characters/elisa-spritesheet1.png",
rect: [4,4,57,57],
pad: 3,
duration: 5,
frames: 3,
reverse: true
},

{
id: "attack",
image: "characters/elisa-spritesheet1.png",
rect: [5,180,93,240],
pad: 3,
duration: 5,
frames: 6,
frames_per_row: 3
}

]
}

Note how ctrl_tongue has its code enclosed in an if statement, so the event handler will only cause anything to happen if Elisa is in her stand animation. If she’s already in her attack animation, the event won’t do anything. This is a simple example of the logic capabilities of FFL. Next time I want to explore FFL in much more detail.

I think this is enough for our first lesson — we’ve added an object, and made her perform a few basic actions. We are a little lacking in documentation on the Frogatto engine right now, and I’m hoping this series can improve it, so please feel free to reply with any questins or comments!


Next Page
Table of Contents
← Previous Page

FacebooktwitterredditmailFacebooktwitterredditmail

Developing with the Frogatto Engine

April 21st, 2012 by Sirp

I’ve made a new video which gives a quick walk through of what it’s like to develop with the Frogatto engine.

FacebooktwitterredditmailFacebooktwitterredditmail

Cool new editor features

April 6th, 2012 by Sirp

I’ve been adding some cool new features to Frogatto’s editor, to make it easy to get instant feedback on how well features in a level work as we add them. Check out this video I’ve made which shows off the new features:


FacebooktwitterredditmailFacebooktwitterredditmail

Frogatto Available for Blackberry Playbook on App World

March 16th, 2012 by Sirp

I earlier posted on our effort to port Frogatto to the Playbook. Frogatto is now available for purchase for $4.99 on the Blackberry Playbook. Find it on Blackberry App World here!

FacebooktwitterredditmailFacebooktwitterredditmail